This page was machine-translated from Korean. View the Korean original →
← Blog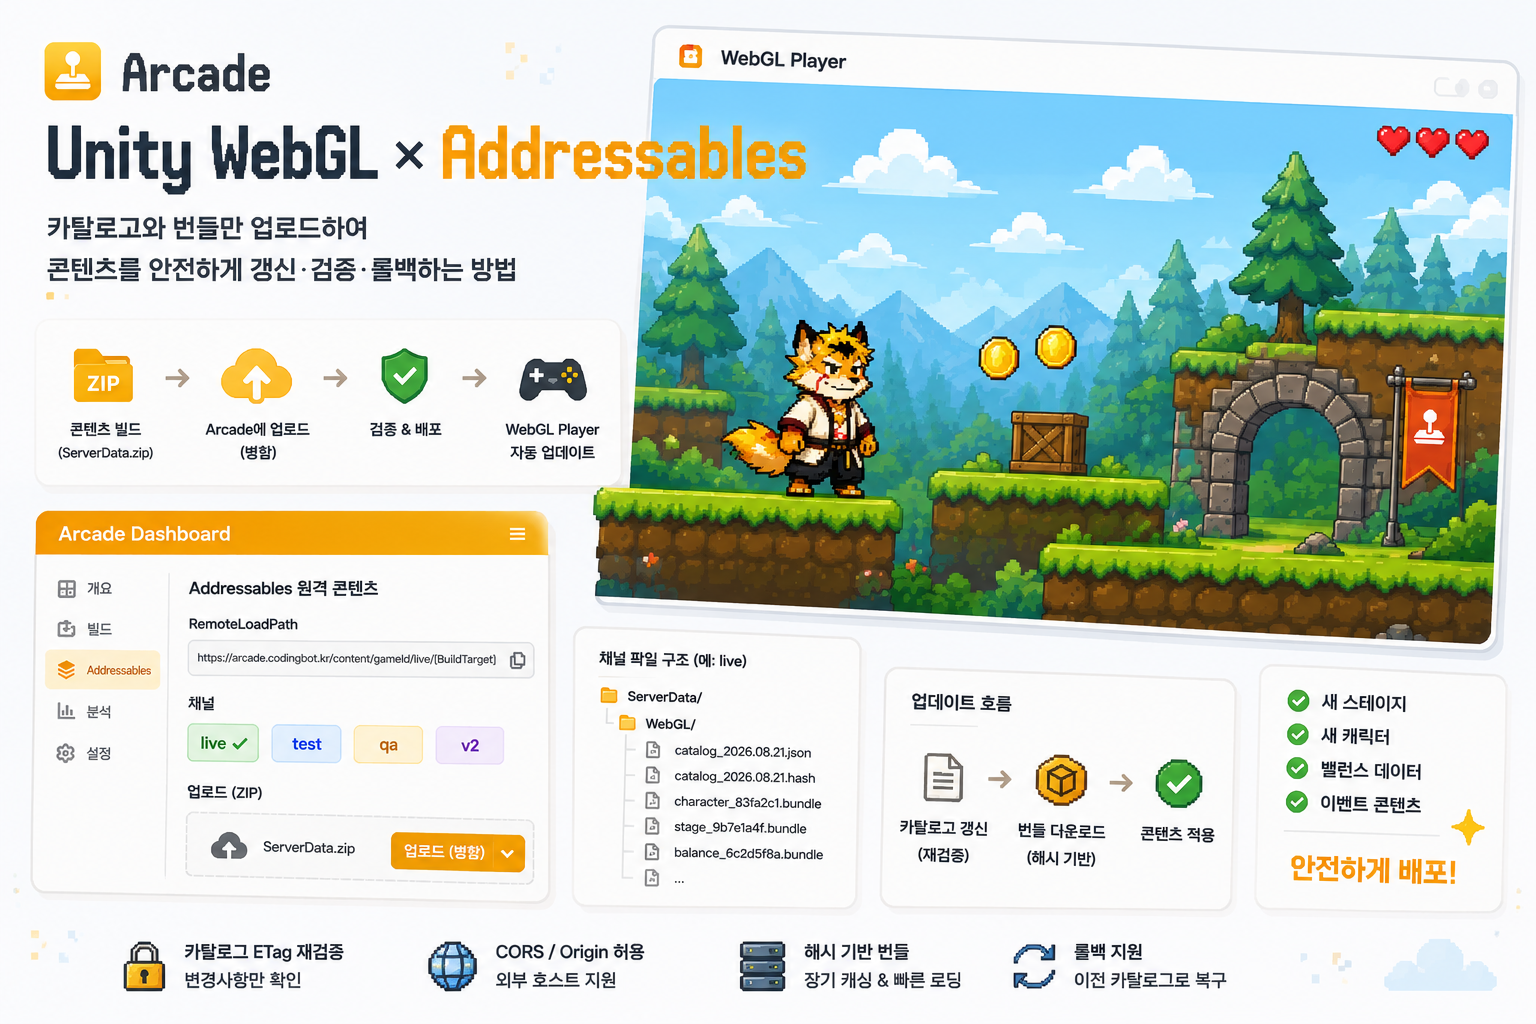
Distributing Remote Content with Unity Addressables
Learn step-by-step how to upload Addressable Sample catalogs and bundles to BCSDLab. Arcade for Unity WebGL games, and how to safely update, verify, and roll back content only.
You do not need to redeploy the entire WebGL Player every time you update your game. By using the Unity Addressables remote content feature, you can upload only the catalog and asset bundles separately to deliver new stages, characters, balance data, and more.
This guide explains how to upload Addressables remote content to the BCSDLab. Arcade dashboard, connect the RemoteLoadPath in your Unity project, and subsequently update or revert content safely.
Before You Begin
Please prepare the following items:
- A game with management permissions in BCSDLab. Arcade
- The Addressables package installed in your Unity project
- An Addressables group to be deployed remotely
- A WebGL test environment to download and verify the content
We recommend separating test content from production channels. If your game is already live, do not upload test materials to the live channel from the start; use separate channels such as test, qa, or preview-1.
Channel names can only contain lowercase English letters, numbers, and hyphens, with a maximum length of 32 characters.
Opening the Game's Addressables Content Screen
After logging into BCSDLab. Arcade, select the game for which you want to deploy content from the dashboard. Open the Addressables Remote Content tab on the game details screen.
On this screen, you can perform the following tasks:
- Check and copy the RemoteLoadPath for each channel
- Upload Addressables content ZIP files
- Allow Origins for external WebGL hosts
- Check the number and size of uploaded files
- View the file list within a channel
- Delete channels that are no longer in use
image.png
Determining Deployment Channels and RemoteLoadPath
Enter the channel you wish to use on the Addressables screen. Typical operational practices are as follows:
- live: Production content used by the currently deployed Player
- test or qa: Test content for verifying new content and settings
- v2: Content for a new Player that is not compatible with the existing Player
A channel is not just a folder name; it is the compatibility scope between the Player and the content. Since an existing Player cannot know the new path if you change the channel after building the Player, you must finalize the channel before building the Player.
Once you enter the channel, the following address will be displayed on the dashboard:
text https:// /content/ / /[BuildTarget]
Copy the displayed value. [BuildTarget] is an Addressables profile variable that Unity replaces according to the build target, so leave it as is rather than replacing it directly with a string like WebGL.
image.png
Connecting Unity Addressables Profiles
Open the Addressables Groups window in the Unity Editor and set the remote path for the profile you are using. Menu names or locations may vary slightly depending on your Unity and Addressables package versions.
Set the remote group paths as follows:
text Remote Build Path: ServerData/[BuildTarget] Remote Load Path: The URL copied from the dashboard
The Build Path and Load Path of the group must also be selected to use the corresponding remote profile variable. Groups using local paths will not be included in the remote content ZIP.
image.png
Setting Bundle Filenames to Include Hashes (Recommended)
In the advanced settings of the remote group, we recommend setting Bundle Naming Mode to Append Hash to Filename.
Because bundles with hashes change their filenames when their content changes, browsers can safely cache them for up to a year. Bundles without hashes will work, but loading performance will degrade because the browser must check the server for changes every time. The dashboard will display a warning if you upload bundles without hashes.
image.png
Building Remote Content
Run the new content build in the Addressables Groups window. If you are only updating content for an existing Player, follow the Addressables Content Update workflow used in your project.
Once the build is complete, the following results are typically generated:
text ServerData/ └─ WebGL/ ├─ catalog....json or catalog....bin ├─ catalog....hash ├─ ... .bundle └─ ... .bundle
There are three things to check:
- The catalog file must be located directly under the WebGL directory.
- There must be a .hash file with the same name next to each catalog.
- The .bundle files of the remote group must be present together.
Compress the ServerData folder into a ZIP, but be careful not to lose the WebGL/ directory structure inside the ZIP. If you select and compress only the files inside WebGL, the [BuildTarget] path will be lost, causing 404 errors at runtime.
text Correct ZIP └─ ServerData/ └─ WebGL/ ├─ catalog....json ├─ catalog....hash └─ ....bundle
Incorrect ZIP ├─ catalog....json ├─ catalog....hash └─ ....bundle
Uploaded ZIP files are needed for future rollbacks. Store them separately, including the channel and release version in the filename.
text Example: addressables-test-2026.08.21.zip
Uploading to the Dashboard
Select the ZIP file and upload mode on the Addressables Remote Content screen.
Use Merge when uploading for the first time or distributing regular content updates.
Merge
- Adds new and changed files to the channel.
- Keeps existing bundles that are not in the ZIP.
- Installs bundles first, then reflects the catalog and hash last.
- Allows player sessions using the previous catalog to continue receiving existing bundles.
- Allows for rollbacks if you have archived the previous catalog/hash.
Replace
- Removes all existing files in the channel and installs only the contents of the ZIP.
- Bundles referenced by the previous catalog may also be deleted.
- There is no automatic recovery or server-side version history.
Use Replace only when reconfiguring a channel with a complete full archive. It is safer not to use this for routine updates on production channels.
Once the upload is complete, check for any layout warnings displayed on the screen. A successful HTTP response only means that the ZIP installation is finished; it does not mean that Unity can read the catalog successfully.
image.png
image.png
Allowing Origins for External WebGL Hosts
If the play page provided by BCSDLab. Arcade downloads the content, no separate configuration is required. This is because the Player and the content use the same Origin.
If you are serving the Player from GitHub Pages, itch.io, an internal test server, or a local development server, you must add the Player's Origin to the Allowed External Origins.
text https://username.github.io https://game.example.com http://localhost:5173
For the Origin, enter only the protocol, host, and port if necessary.
text Allowed: https://game.example.com Allowed: http://localhost:5173 Denied: https://game.example.com/play/my-game Denied: https://game.example.com/ Denied: .example.com
localhost and 127.0.0.1, HTTP and HTTPS, and different ports are all considered different Origins. Check the Origin in the address bar of your actual WebGL page and in the browser developer tools to register it accurately.
image.png
Verifying Deployment Results in the Browser
Immediately after uploading, you must load and verify the remote assets in the actual WebGL Player.
- Open the browser developer tools.
- In the Network tab, clear the cache and reload the Player.
- Filter requests by catalog, hash, and bundle.
- Verify that the catalog and hash load successfully.
- Confirm that the bundle containing the new content is returned with a 200 status or a normal cache response.
- Check the Console tab to ensure there are no CORS errors or 404s.
You can verify the response headers based on the following criteria:
| File | Expected Content-Type | Expected Cache Policy | |---|---|---| | catalog.json | application/json | no-cache and ETag revalidation | | catalog.bin | application/octet-stream | no-cache and ETag revalidation | | catalog.hash, .hash | text/plain | no-cache and ETag revalidation | | .bundle with hash | application/octet-stream | 1-year immutable | | .bundle without hash | application/octet-stream | Revalidate every time |
If the compressed file name ends in .br or .gz, also check for Content-Encoding: br and Content-Encoding: gzip respectively. LZ4/LZMA compression inside a Unity bundle is a different concept from HTTP Content-Encoding, so it is normal even without separate encoding headers.
image.png
Deploying Content Updates
When updating live content, repeat the following sequence:
- In Unity, create an Addressables content update that is compatible with the existing Player.
- Create a ServerData ZIP containing the catalog, hash, and new bundles.
- Save the ZIP separately in your release archive.
- Select the same channel used by the Player.
- Upload in Merge mode.
- Check layout warnings and channel statistics.
- Verify the new content in a new browser window with the cache cleared.
- Ensure that sessions already in progress can still receive the necessary assets.
The catalog and hash cause the browser to re-verify changes with the server, and new bundles with hashes are downloaded via new URLs. This avoids issues where the new catalog is not updated due to long-term caching of the previous bundle.
Rolling Back to Previous Content
If a problem is discovered after a merge deployment, you can revert using the catalog and hash archived from a previous release.
- Temporarily pause additional uploads to that channel.
- Prepare the .hash file that exactly matches the catalog of the previous release.
- Create a ZIP with the same ServerData/[BuildTarget]/ path as the original.
- Upload to the same channel in Merge mode.
- Verify that the catalog and hash are revalidated.
- Confirm that the previous content is reloaded in the actual Player.
This method only works if the bundles referenced by the previous catalog remain in the channel. If you have deleted the channel or uploaded in Replace mode, you must re-upload the entire previous ServerData archive.
Final Checklist Before Deployment
- [ ] Used different channels for test content and live content.
- [ ] Confirmed RemoteLoadPath and channel before building the Player.
- [ ] The [BuildTarget] directory structure is maintained inside the ZIP.
- [ ] A hash file with the same name as the catalog is included.
- [ ] The 32-character content hash is appended to the bundle name.
- [ ] Regular updates were uploaded in Merge mode.
- [ ] Registered the correct Origin if using an external host.
- [ ] Verified catalog, hash, and bundle requests in the browser.
- [ ] No CORS errors or 404s in the Console.
- [ ] Archived the upload ZIP and previous catalog/hash for each release.
Frequently Asked Questions
Does the WebGL Player change automatically when I upload content?
No. You can only update without rebuilding the Player if the RemoteLoadPath included in the Player points to the same channel and the new catalog and content are compatible with the existing Player.
Can I just rename the test channel to live after testing is finished?
Channels are part of the URL and are included in the Player. You cannot promote a channel by renaming it. If the live Player uses live, you must separately merge and upload the verified content to the live channel.
The upload was successful, but the game cannot find the catalog.
First, check if the [BuildTarget] directory, such as WebGL/, was lost inside the ZIP. If the catalog and hash are at the root of the ZIP, the RemoteLoadPath in the dashboard will not match the actual file path.
I get CORS errors locally, but it works on the deployment page.
Add the exact Origin of your local Player to the allowed list. For example, if your development server is http://localhost:5173, you must register it exactly as is, including the protocol and port.
Can I delete a channel?
Delete it only after confirming that no Players are using that channel anymore and that it is not needed for rollbacks. Deleting a channel removes all catalogs, hashes, and bundles for that channel and cannot be automatically recovered.
![[Arcade Development Log] Integrating Arcade backend to start LiveOps](https://images.unsplash.com/photo-1585620385456-4759f9b5c7d9?crop=entropy&cs=tinysrgb&fit=max&fm=jpg&ixid=M3w5NjEyMDZ8MHwxfHNlYXJjaHwxOHx8R2FtZXxlbnwwfHx8fDE3ODY1NTA2NjR8MA&ixlib=rb-4.1.0&q=80&w=1080)
![[Arcade DevLog] Bringing games to life with LiveOps](https://images.unsplash.com/photo-1573164713988-8665fc963095?crop=entropy&cs=tinysrgb&fit=max&fm=jpg&ixid=M3w5NjEyMDZ8MHwxfHNlYXJjaHw5fHxTZXJ2ZXJ8ZW58MHx8fHwxNzg2NTQ0ODYzfDA&ixlib=rb-4.1.0&q=80&w=1080)